 Round
robin quilts can be a fun experience for a group of quilters to do together.
It will challenge each quilter in their design work, their color choices
and creativity.
Round
robin quilts can be a fun experience for a group of quilters to do together.
It will challenge each quilter in their design work, their color choices
and creativity.
What follows is my story and what we learned in the process. Margreta, Leslie, Margaret, Robin and Cathy all agreed
to give it a go.
The success of a round robin quilt depends on a few factors:
- well defined rules
- willingness to do one's best
- accept the final quilt owner's decision
Well defined rules
Rules need to cover things such as acceptable size of the center block,
time frames for exchanging blocks, type of work to be done at
each stage, progression from person to person.
These were our rules:
"Bring a completed center block to
our next meeting. The center block is the design of your choice. It
may be any size between 12 inches and 18 inches square. (The center
block, all borders, cornerstones, or whatever should be carefully
squared each step of the project.)
Put your block in a box or bag with any fabrics that you want included
in the borders. If you do not include fabrics, the person adding the
border will select and supply fabric of her choice. Include a disposable
flash camera if you want a record of each step in the creation of
your top. Use the small "quilt journal" to include pieces
of fabric, make sketches, or to write notes about your work on the
project. Leave spaces for the pictures if a camera is included. The
quilt top belongs to the person who made the center.
Borders should be between 3 inches and 6 inches wide.
- Round 1 -- pieced border, triangles - Leslie
added the first border
- Round 2 - appliqued border - Robin
added the second border
- Round 3 - pieced border, rectangles - Margaret
added the third border
- Round 4 - embellishment or border of your choice - Cathy
added the fourth border
Option - in lieu of any one of the four rounds, the block may be
turned on point, if appropriate. Triangles are then added to each
side of the "diamond" to make it into a square again. Applique
or embellish the corners.
Lesson learned - we might have established an overall size that
these quilts would not exceed. The quilts varied in size, especially
when someone exercised the option to put the block on point.
Willingness to Do One's Best
Each person had two months in which to add a border. Sometimes that
time would feel very pressured if our lives were busy. But, we all attempted
to do our best. And, we all accepted that each person would do what
they could. In other words, don't criticize the work.
Accept the Final Quilt Owner's Decision
Sometimes the final quilt owner will want to add more embellishments
or add an additional border. If the piece doesn't lay flat, the final
quilt owner may take it apart and add something to fix it. While my
quilt didn't have this problem, we did have one quilt in the group that
wasn't flat. The owner of the quilt took it apart, added a spacer, and
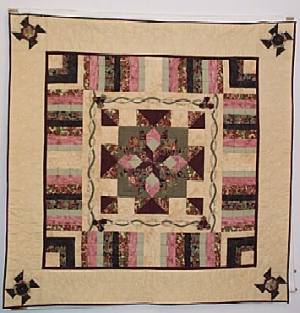
reassembled it. With my quilt, Cathy did the final pinwheel cornerstone
border. She offered to make a few three dimensional embellishments,
which I did like and used in the final quilt. Since the quilt belongs
to the owner, accept his or her decision about what to do with the quilt
top.
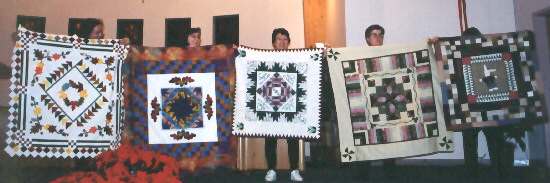
Below are all the round robin quilts:
My quilt was quilted by my cousin, Kim
Tjoelker.
Other resources
- "Round Robin Quilts: Friendship Quilts of the '90s and Beyond"
by Patricia Maixner Magaret and Donna Ingram Slusser. Published by
That Patchwork Place, Inc., 1994 (book is out of print, but can be purchased used)
- "Friendships in Bloom: Round Robin Quilts"
by Marjorie Nelson (and Rebecca Nelson-Zerfas. Published by Kansas City Star Books, 2003.
- "M'liss Rae Hawley's Round Robin Renaissance" by M'Liss Rae Hawley. Published by C&T Publishing, 2006.
I have posted additional information, based on other people's inquiries on this topic on my blog. Feel free to read more there and, if you have more questions, please leave me a comment.